In my last post, I bumped into Amazon Lightsail and discovered the joys of virtual servers. In this post I’m going to talk about how a Linux noob like me figured out what to put in Lightsail’s Create Instance launch script to build a LEMRS stack. In my next post, I’ll show you the actual Lightsail script I’m using.
Like R itself, Linux has add-on packages. In R, we use the install.packages() and installed.packages() functions to load additional packages and to see which ones are installed. In RStudio, there’s also the Tools/Install Packages… dialog and the Packages tab in the Files pane. Various versions of Linux also have different ways of installing packages; Amazon Linux uses one called yum.
(When you create a new instance on Lightsail, first you pick an instance image. The ones that come up automatically are full-fledged stacks, but there’s also an OS Only button that gives you the choice of five different flavors of Linux. I picked Amazon’s own because I don’t know enough about any of the five versions to care and I figured that if there was any necessary optimization for Lightsail, Amazon was the most likely version to include it.)
There are a lot of similarities between install.packages() and yum. First, if the package you’ve chosen depends on other packages, both will automatically seek out and install the additional packages. Second, both have repositories they use to seek out packages to load. And in both cases, unfortunately, there are packages we need that aren’t in the respective repositories.
Moreover, to build a LEMRS stack, there’s a multidimensional aspect to all this – some R packages depend on Linux packages being previously installed. But there’s nothing automatic about these “dependencies.” The only way to discover them is to run install.packages() in R and pay close attention to its error messages. Then run installed.packages() to make sure all of the packages you thought were installed were actually installed.
As I write this in October 2017, Lightsail offers its smallest instance, which has half a gigabyte of RAM, for free for a month. You can use this free month to figure out some of this dependency stuff and other configuration issues. However, I have been unable to install all of the R packages I need using the smallest instance. On the other hand, I’ve had no trouble at all using the next larger instance, which has 1 gigabyte of RAM.
To get started, you have to open an account at Amazon Lightsail, pick an Amazon data center near you, and Create an instance. If you pick an image other than Amazon Linux for your instance, it’s likely the yum command will be called apt-get, which I know nothing further about. Once you create an instance, your Amazon Lightsail page will look like this:
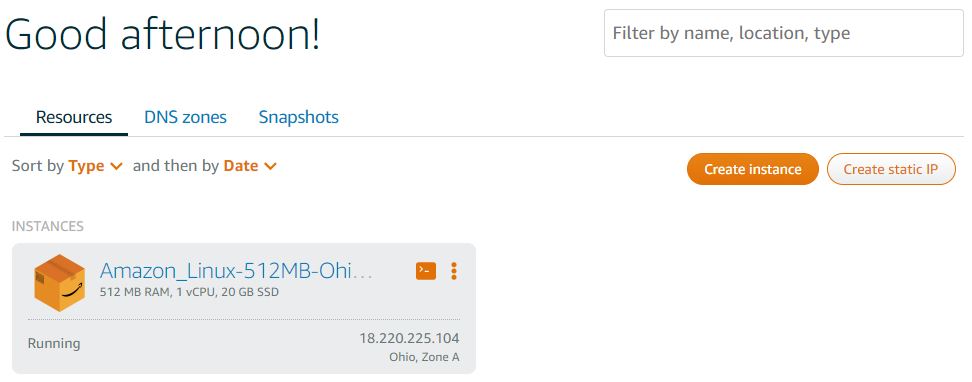
In the grey rectangle, at the upper right, there’s a square icon and a three-vertical-dots icon. Clicking the dots icon pops up a menu with Connect, Manage, Stop, Restart, and Delete choices. You can also connect by clicking on the square icon. In either case, here’s what opens on your screen:

Yes, a command-line interface! Keep in mind the instance you’ve created is a server, not a desktop computer. An administrator doesn’t really need to interact with a server much once it’s set up, so the interface is basic. The minimal software needed for the simple interface is a big reason why the server is getting by with a half-gigabyte of RAM while a typical desktop computer has at least 10 times that.
If you want to be successful at this, you need to concentrate on what the terminal is telling you. In this terminal snapshot, note that it says right there on the screen, Run “sudo yum update” to apply all updates. It also says there’s a more recent version of Amazon Linux, but as of today the newer version isn’t available to create Lightsail instances.
After that there’s a line that begins [ec2-user@. That’s you. Note that you got here without entering a password. Lightsail user accounts don’t have passwords, they use ssh keys. In your initial setup with Amazon, you downloaded your half of the key. I think I will only need the one default user account, but here’s a link if you need to know more about additional Amazon Lightsail user accounts for carbon-based creatures. Silicon-based creatures like nginx and shiny will also have user accounts, but those are created by the installation software, not you.
The sudo in sudo yum update tells Linux to run the command as the superuser of the instance. The superuser is also known as the root user. Again, in Amazon Lightsail there are no passwords – once your instance is set up, the only access you have to its superuser account is through sudo and its options. However, as I mentioned earlier, while the instance is being created, you can also use a launch script that runs as the superuser.
When you enter sudo yum update as instructed by the terminal, first you’ll see a list of all the packages yum is ready to update, followed by the question, Is this ok [y/d/N]: The “d” means to download the packages without installing them. In the install script you won’t have a chance to answer, so you’ll actually use sudo yum update -y. The -y tells Linux that if it has any questions, the answer is yes.
Once the update is complete, enter yum install R. The terminal will respond, You need to be root to perform this command. While you won’t always need to use sudo, it’s required here, so enter sudo yum install R. Just as before, first yum figures out what other packages R depends on, shows you the list, and asks if it’s ok to proceed. Answer yes and a long list of Linux packages will be added to your system.
Next we’re going to enter the command sudo R and the R console will open inside the terminal window. (To get out of the R console and back to the terminal, use the q() function.) Be warned, however, that I can already hear people yelling that we should NEVER run R as the root user. The problem is that when you do that, any R program you run inherits those superuser privileges. But for now we’re just playing around in an instance we’ll end up deleting. Ignore the yelling. In the end we’ll install R packages a safer way, but still using the root account because that makes the packages accessible by all of the system’s other users, too, including shiny.
The first package you should install after sudo R is called Rcpp. It provides a framework for R to access C++ programs. Many other R packages depend on it. But it seems to hang while installing. In R, enter install.packages(“Rcpp”). Unlike yum, R will next present you with a list of over 50 repositories to choose from (you can also specify a repository ahead of time as a parameter.) When the installer seems to stop running, just close the terminal window and wait a few minutes. Then open a new connection, sudo R, and enter installed.packages()[,1:3]. If you’ve waited long enough and the stars are aligned correctly, you’ll see that Rcpp is, in fact, now installed. (If you can’t get it to install, try again with a 1 G RAM instance, which doesn’t require aligning stars.)
The second package you should install is called devtools. After it runs, you’ll see some warning messages just above the cursor. They tell you that R figured out that devtools wouldn’t work without a bunch of other packages and that it was unable to install the ones called curl, openssl, git2r, and httr. Scroll up and look for error messages. You’ll see sections like this:
 ---------------------------------------------
 The OpenSSL library that is required to
 build git2r was not found.

 Please install:
 libssl-dev (package on e.g. Debian and Ubuntu)
 openssl-devel (package on e.g. Fedora, CentOS and RHEL)
 openssl (Homebrew package on OS X)
 and try again.
With Amazon Linux, it’s typically the CentOS version of the package you need. So q() R and back in the terminal enter sudo yum search openssl-devel to see what yum has available.
[ec2-user@ip-172-26-5-89 ~]$ sudo yum search openssl-devel
Loaded plugins: priorities, update-motd, upgrade-helper
==================== N/S matched: openssl-devel===================
openssl-devel.x86_64 : Files for development of applications which will use OpenSSL
xmlsec1-openssl-devel.x86_64 : OpenSSL crypto plugin for XML Security Library

 Name and summary matches only, use "search all" for everything.
[ec2-user@ip-172-26-5-89 ~]$ sudo yum install openssl-devel.x86_64
In general, the package you want is always the one that ends with .x86_64. So next you’ll sudo yum install openssl-devel.x86_64 (while making careful notes that you did this!); go back to R; install.packages(“devtools”); study the error messages; return to the terminal; search for suitable packages; install them (don’t forget to write down the package name!); and repeat until devtools installs.
Then repeat for all the other packages you need. When you get to shiny-server itself, however, you’ll discover it’s not in the R repositories. You have to look for the current version on the shiny website. Be sure to click the RedHat/CentOS tab to get the right version. The page includes the commands you need to enter to install shiny-server.
Next up, the full launch script for creating a LEMRS stack on Amazon Lightsail.