Connections from your own computer to your instance on Amazon Lightsail are made using SSH keys rather than passwords. Here are some tips for setting up connections between some useful Windows programs and your instance.
Lightsail Connect
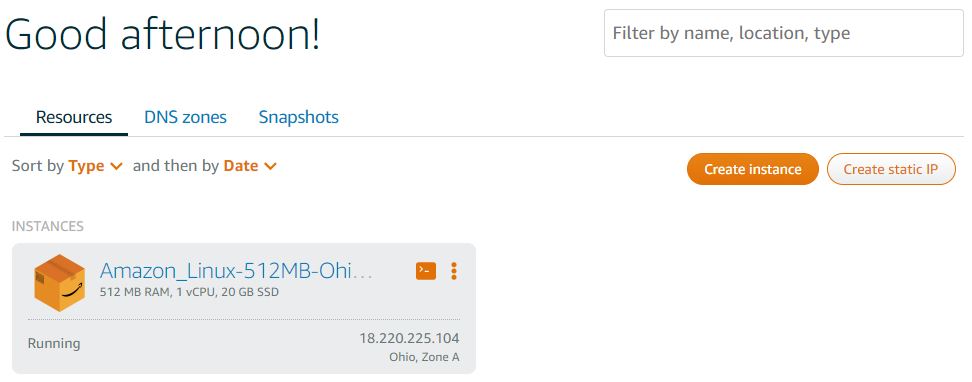
The easiest way to set up a terminal-type connection is from your Amazon Lightsail dashboard, as shown in the following figure. In the upper-right corner of each instance there’s a square icon and a 3-dot icon. You can open a terminal window in one step by clicking the square icon. If you prefer two steps, click on the 3-dot icon and select the Connect item from the menu. For three steps, click on the 3-dot icon, select the Manage item, then click on the Connect using SSH button on the Connect tab.
All three methods open a window with a command-line interface called bash that’s connected to your instance. Although Copy/Paste exists, it requires a stutter-step. At the bottom-right corner of the terminal there’s a clipboard icon. Highlight text in the terminal with your mouse, then click the icon. A little window will open with the terminal text, which you need to highlight a second time and press control-c to copy to the Windows clipboard. To paste from the Windows clipboard, you click the icon to open the window, control-v to paste the text in the window, then right-click in the terminal window to paste the text in the terminal.
Another problem with Lightsail’s direct connection to your instance is that it times out fairly quickly. On the other hand, it’s the only method that doesn’t require messing around with SSH keys.
SSH key basics
An SSH key is like a password, but much longer and, consequently, saved in a file on your computer. In addition to being a password it can provide additional features related to security. Although I’m calling it a key here, it’s actually a key pair, with Amazon holding the public key and you holding the private key.
Once you’ve logged into your Amazon Web Services account with your username and password, all other interactions require SSH keys rather than passwords. At a minimum, you need one SSH key pair for each Amazon region you use and you can have up to 100 key pairs per region.
For each Amazon region, one of your key pairs is the default pair. When you create a new Lightsail instance, it will use the default pair unless you specify differently. When you create a new instance, the link to Change SSH key pair is right below the link to Add a launch script.
Your initial key pair is set up when you create your Lightsail account. If you love to be confused, or if you have another, better reason, you can set up more key pairs by clicking the Account button at the top of your Amazon Lightsail dashboard. One of the tabs on the page that appears is named SSH keys. This is where you create new key pairs. After you create a key pair, you download its private key, which is a small file that ends with .pem.
One of the additional security features of SSH keys is confirmation that you’re actually connecting to your own instance and not being clandestinely misdirected to a charnel house trying to steal your private key. However, the first time you connect to your instance from any of these programs, you’re likely to get a message saying The server’s host key was not found in the cache. If this is your first connection, click the Yes button to trust the connection.
That should be the end of this story, but it’s not. All of the following programs require the key to be in .ppk format, which is an encrypted .pem. To covert from .pem to .ppk you need a little program called puttygen, which comes with PuTTY.
PuTTY
So, whether you want to use PuTTY or not, to use any of the other programs here you have to download and install it. After installation, you’ll find puttygen in the PuTTY folder of your start menu. Using it is pretty simple. First click the Load button and browse to your .pem file. Then click the Save private key button. It’s possible to add a passphrase to the .ppk file, but I didn’t do that, so I’m not sure how that would impact the rest of what I have to tell you. Without a passphrase, anyone who has a copy of the file and knows what they’re doing can use it with any of these programs to access your instance. Translation: don’t ever share your private key!
PuTTY is a more configurable alternative to direct Lightsail connections. When you start it you get a PuTTY configuration window. On the left is a list of categories and on the right you can change the settings for a category.
The first category, Session, lets you name, load, and save configurations, which just means the things PuTTY needs to know to connect to a specific remote computer or Lightsail instance. Things work best if you enter the information PuTTY needs to connect and then save all that as a session. All of these programs have something similar to save specific configurations. PuTTY’s user interface for this is by far the worst, while FileZilla’s Site Manager is by far the best.
Although PuTTY provides dozens of configuration options, you only need to provide three pieces of information to connect PuTTY to Lightsail. In the Session category, for Host Name enter the public IP of your instance (or domain name, if you’ve set that up). In the category Connection click on Data and for Auto-login username enter ec2-user. Finally, near the bottom of the Connection category is a sub-category labelled SSH. Click the plus sign next to it, and in the list that appears click on Auth. This is where you’ll find the Browse… button that lets you select your .ppk file. You can now go back to the Session category at the top of the list and save those settings. Now the Open button at the bottom will connect PuTTY to your instance.
Copy/Paste in PuTTY is abnormal but easy. When you highlight text in the PuTTY window with your mouse, it’s automatically copied to the Windows clipboard (there’s no other reason to highlight terminal text!). To paste from the Windows clipboard, point to where you want the paste to go and click the right mouse button.
Here’s the complete PuTTY User Manual.
PuTTY and Lightsail connections allow you to interact with the bash command-line interface of your instance, but sometimes what you really want is to be able to copy files back and forth between your computer and your Lightsail instance. Here are two possibilities for that: FileZilla and WinSCP.
FileZilla
Download FileZilla and install it. The hardest part is figuring out what to do after you start the program. You need to get to the FileZilla Site Manager. Here are three ways to do that: click the icon immediately below the File menu, pick Site Manager… from the File menu, or press ctrl-S.
Otherwise, the FileZilla user interface is a breeze compared to the one for PuTTY. On the left side of the FileZilla site manager you create, organize, and delete site configurations. On the right side there’s a section with four tabs, but everything you need to enter is on the first one, General.
First click the New Site button and give this connection a name. For Host, enter the public IP or domain name of your instance. For Protocol, select SFTP – SSH File Transfer Protocol. For Logon Type use Key file. For User enter ec2-user. For Key file, browse to and select your .ppk file. Finally, click the Connect button, which will both save this site’s configuration and connect you.
The list of files on the left are on your computer and the list on the right are on your Lightsail instance. Dragging files from one side to the other copies them between your computer and your instance.
Here’s the FileZilla User Guide.
WinSCP
Download WinSCP here. For the most part it does the same thing FileZilla does, but it has some additional features, including a tighter relationship with PuTTY. The feature I like best, however, is an integrated text editor that lets you see what’s inside files just by double-clicking on the file’s name.
When you start WinSCP it also automatically opens the equivalent of FileZilla’s site manager, which is a window called Login. From there however, we’re back to PuTTY-like hidden configuration options.
In the site area on the left, pick New Site. Then, on the right, File protocol should be SFTP; Host name is the public IP number or domain name of your instance; and User name is ec2-user. Leave Password blank.
Now click the Advanced… button. (If instead you click the dropdown triangle on that button, then select Advanced… from the menu that appears.) In either case, a PuTTY-like window appears with categories on the left and configuration options on the right. Ignore it all except the Authentication sub-category under the SSH category. That’s where you’ll find the Private key file field. Click the icon at the end of the field to browse to your .ppk file. Then click OK, then Save, then Login.
WinSCP defaults to an interface similar to FileZilla’s, but if you select the Options menu, then Preferences…, then Interface (under Environment) you can change it to a Windows Explorer-like interface. In this case WinSCP shows you only the files on your Lightsail instance. To copy files back and forth you drag them between WinSCP and Windows Explorer. WinSCP also has a Properties button that you can use to change the ownership or permissions of files, which otherwise you’d have to do with chown and chmod commands in a bash terminal connection.
Here’s the WinSCP documentation.
HeidiSQL
If you have MySQL or MariaDB running on your instance, you can connect to it and manage the database with HeidiSQL. When you start HeidiSQL, a session manager window will open.
To connect to an SQL database running on a Lightsail instance, start in the Settings tab. For Network type use MySQL (SSH tunnel); for Hostname/IP use localhost; for user and password enter the credentials for a MySQL user on your system. You can leave the other fields unchecked or blank.
Next, on the SSH tunnel tab, browse to plink.exe by clicking the icon at the end of that field. Plink is part of PuTTY (in my case it was at C:\Program Files\PuTTY\plink.exe). For SSH host + port use the public IP number or doman name of your instance and port 22; for Username use ec2-user; leave Password blank; and for the Private key file browse to the .ppk version of your key file.
Here’s the HeidiSQL help file.
Thanks to Arcus Global for sharing how to connect Heidi to Amazon instances.
Very good post. The information is very helpful and answered a lot of my questions. Good work and thank you!
Excellent! This article helped me connect Filezilla to a Lightsail instance with Linux. The only difference is that my user name was “bitnami” rather than “ec2-user.” However, the user name is easy to find in the Lightsail dashboard, so that was an easy fix.
Thanks, this was excellent and I was connected to Lightsail via SCP in minutes :)